
That’s great. Let’s see how it goes! 
Igniter
The first attempt to control the igniter will be done utilising a relay module with the following specifications:
- 3V input
- Max 10A on the controlled electric circuit (AC or DC)
- Relay with an optocoupler and the possibility to power the relay electromagnet with an external power source.
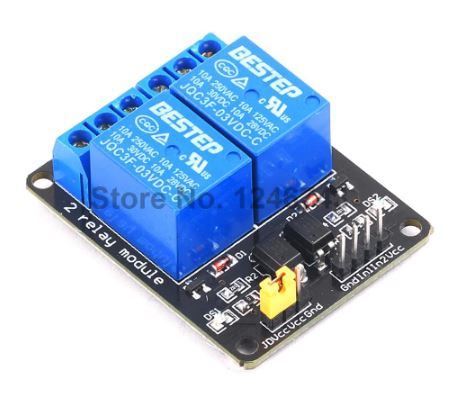
We would like to separate the relay electromagnet power source from the Arduino in order to protect the board.
Here it is explained why: video
The system will probably present an issue at the Arduino’s boot (power-on) sequence, since the input/output pins are put to low and in this condition the relay close the main electric circuit. This condition will induce a switch of the relay.
Example of the issue: video
Possible solutions (to be tested):
- Power-on the Arduino while the power source of the igniter electric circuit is turned off. Then turn on the igniter power supply (or the relay module power supply).
- Modify the code with one of the proposed solutions in this discussion: link
Feel free to comment and propose other solutions. We are happy to evaluate different ideas
3 « J'aime »
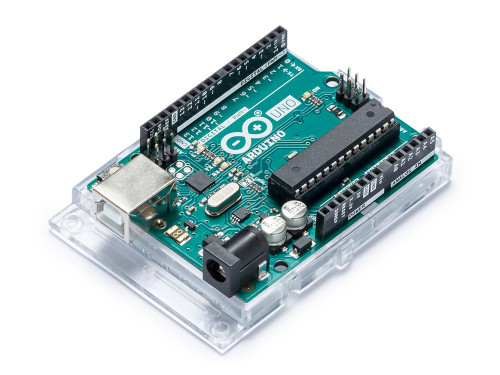
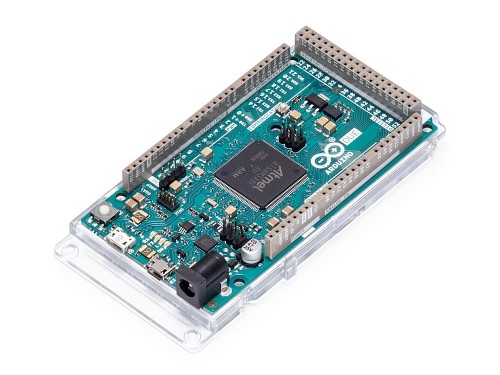
The Arduino Uno and Due are coming! 
I bought them with other components on the following websites:
If you know other French or European websites, don’t hesitate to share them! 
We need to order two important components:
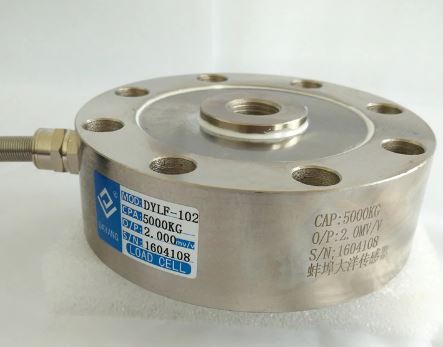
- Load cell to record the engine thrust;
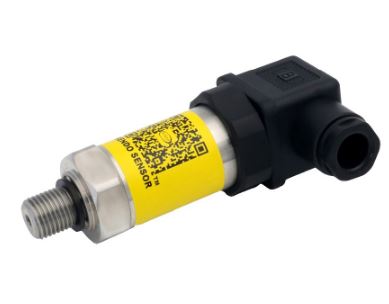
- Pressure sensor to record the combustion chamber pressure.
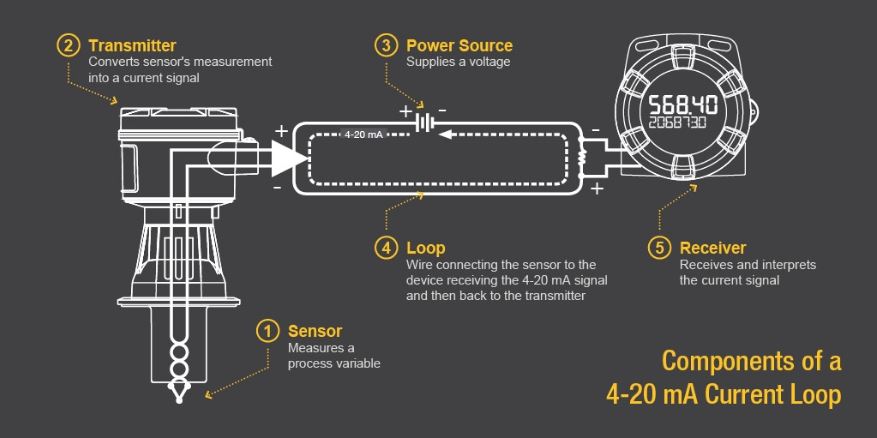
Data will be transmitted as current values (4-20 mA) in order to reduce noise susceptibility.
The different technologies available are described here: Link
However, this data transmission technology requires additional components:
- transmitter, typically integrated in the sensor;
- power supply (12V) for the transmission line;
- receiver to interpret the signal (in our case, to convert the analog current signal in an analog voltage signal which can be easily read by a microcontroller).
The following 4-20mA Current Loop schema has been taken from this site (Link) where you can find a nice explanation of the principle.
We need to define the full scale value for both sensors.
The selected value has to be in the middle of two opposite needs:
- obtain a good data resolution;
- protect the sensor from minor engine failures.
@tid, @iervese.francesco, can you share the updated engine specifications?
1 « J'aime »
I don’t think we have updates on this. So let’s try to proceed a bit by instinct
From the preliminary sizing we did a bit ago.

The specs would be:
Thrust: 1kN
Pressure: 2 bars
Adding a margin a would say 5 to 10 kN for thrust and up to 10 bar for chamber pressure. @luca.litterio could you maybe list few solutions here with prices so we think about it? What’s the digital resolution we have with the Arduino and the SiFive? How many bits? Do we need a Whitstone bridge or a conditioning box?
1 « J'aime »
Moreover I think we can go directly to sensors with voltage output wrt current. Even if current based are less prone to noise disturbances, the difficulty will be shifted to the current <–> voltage converter. So let’s go with the voltage ones and, if we have disturbances, we’ll deal with them later on.
Note: as a reference, I report aliexpress.com products to give you an idea of the prices.
Example of load cell:
- Pancake load cell, different load ranges (Link)
I would like to take a pancake shape since it presents a low profile and a female center-thread to facilitate the connection.
Example of pressure sensors:
- Pressure sensor 4-20mA, gauge type, different pressure ranges (Link)
I would like to buy a sensor that can withstand relatively high fluid temperatures.
I didn’t check the resolution of the Arduino built-in analog-to-digital converter.
I already bought the following analog-to-digital converters:
Note: SPS - Samples Per Second

No, from my understanding of the 4-20mA Current Loop, we should obtain a digital signal (I2C transmission type) with the following components:
- Load cell / Pressure sensor
- 4-20mA to 5V or 3.3V converter (analog input, analog output)
- Analog-to-digital converter ADS1115 16 bit
- Power supply for the Current Loop (12V)
As an alternative to the analog-to-analog converter, I have seen reviews where a 250kOhm high precision resistor in parallel to the ADC is utilised. Nevertheless, I prefer to use an industrial graded module to do so.
I will search more information on the current-voltage converter. It is true that it can be an issue.
There are three possible ways of transmitting the data (Link):
- millivolt → it is prone to noise and need a well regulated power supply;
- Volt → it is less prone to noise but still need a regulated power supply for 0-5V range;
- current (mA) → it is the least prone to noise. Apparently the current output can have issues if the system is battery powered.
I will go on checking the « pros and cons » of each solution. Nevertheless I am worried about the noise experienced during the Skyward engine tests and I would like to avoid it from the beginning, if possible, since we faced it.
1 « J'aime »
We need to define also the connection thread: NPT or Gas (BSPP or G, parallel thread).
G thread can create issues on a spherical surface because, unlike the NPT, it requires a sealing ring to be squeezed in the connection joint (see the central schematic in the following image):
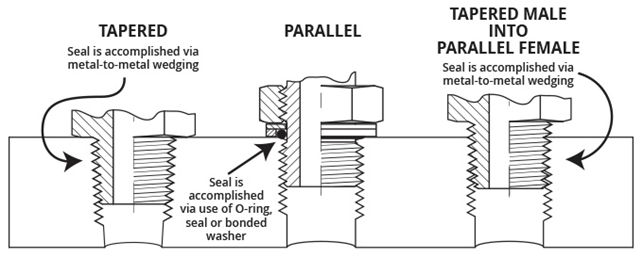
There is also the Rp thread (male conic G thread and female cylindric G thread).
NPT thread is common in US. G thread is common in EU and easy to find.
Rp is an European thread but I think that it is less common.
I think that the easiest solution is to use G threads (parallel Gas thread).
Anyway, we should utilise one thread type for all the feed line. Hence I propose the G thread and if we have to connect a pipe on the lateral combustion chamber wall, we can try to use a G-to-Rp adapter.
I would like to have your feedback on this @iervese.francesco, @tid. Thanks ![]()
1 « J'aime »
I also bought this:
https://store.pine64.org/?product=rock64-media-board-computer
For a personal project. It’s another alternative to the RPi. I’ll let you know how it goes.
1 « J'aime »
Another very interesting alternative: https://www.pjrc.com/teensy/
2 « J'aime »
For other alternatives, you should have a look at Make the original guide to boards. It is updated every year…
2 « J'aime »
Hello everybody! Long time no see. I took a bit of time to rearrange the topics in the forum category: now there’s only one thread available where to sink all the unstructured discussion.
I also re-organized the documentation here. I also added the PDF of the final report for the internship of the École polytechnique students.
2 « J'aime »
Hello everybody, the days go by and life happens meanwhile. Unfortunately I’m not in the position of managing this project anymore, therefore I have marked the project as inactive in the platform!
I’ll keep hosting the documentation and be reachable if anyone wants to takeover the project.
Cheers!
2 « J'aime »
Hello everyone,
Eve is now back on track !
Thanks to Ruben’s handover, a small group of young engineer and students are now working again on the project, it even motivated previous members to participate again !
A good time to join if you’re interested.
As a symbol for EVE coming back to life, here a logo for it :

4 « J'aime »